

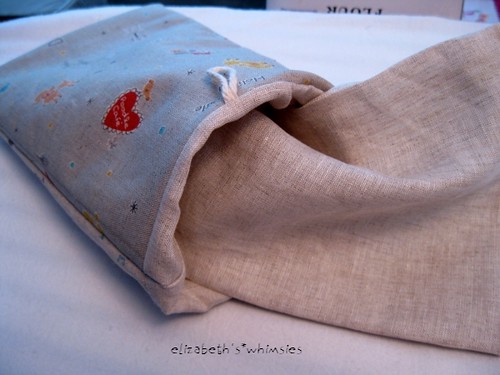
I haven't been able to bring my Kindle anywhere because I'm afraid it will get scratched. Today, I decided to make a sleeve for it and decided to photograph the steps and present it as a tutorial in case anyone else wants to make one. So here goes!
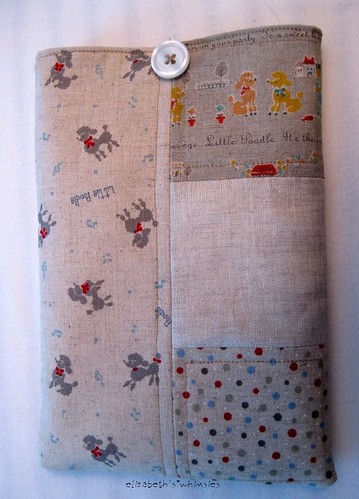
Patchwork Kindle Cover
This cover has a finished size of 8.5 x 6 inches and fits a Kindle 7.5 x 5 inches or a similar-sized e-reader. The seam allowances are ¼ inch unless otherwise stated. Click on the images to see them full-sized on Flickr.
Materials:

- four or five different fabric prints (I used coordinating Japanese linens)
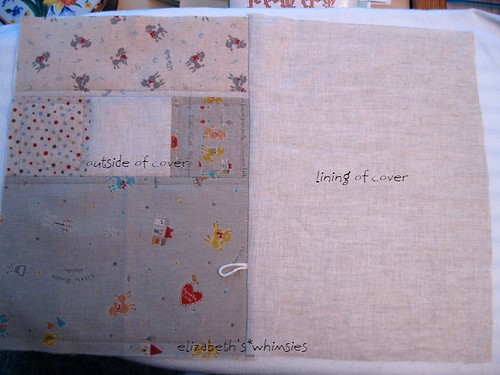
- one 12.5 x 9 inch fabric piece for lining(I used plain linen)
- thin cotton batting at least 13 x 9.5 inches
- 3/4” button
- 4” of cotton yarn or twine
- sewing supplies (machine, iron, thread, pins)
Procedure:
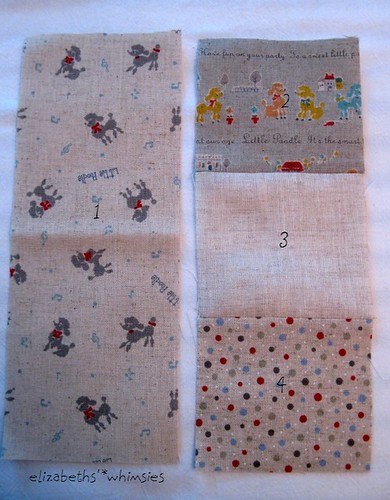
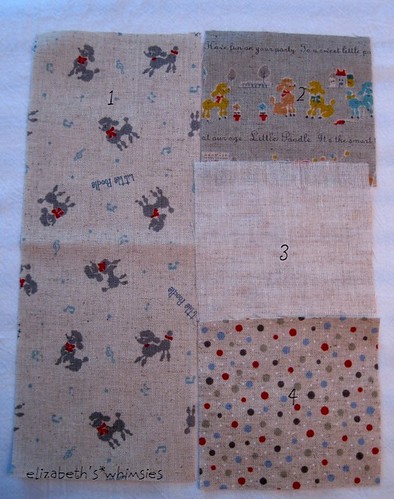
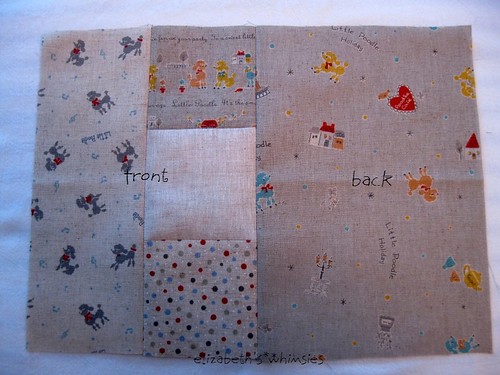
1. Cut a long piece for the left side of the front 9 inches long x 3.5 inches wide from one print and then from three different prints, cut two pieces 3.25 inches long x 3.5 inches wide and one last piece 3.5 x 3.5 inches.
2. Cut your lining piece 12.5 x 9 inches and cut the back print 6.5 wide x 9 inches long.
2. Cut your lining piece 12.5 x 9 inches and cut the back print 6.5 wide x 9 inches long.
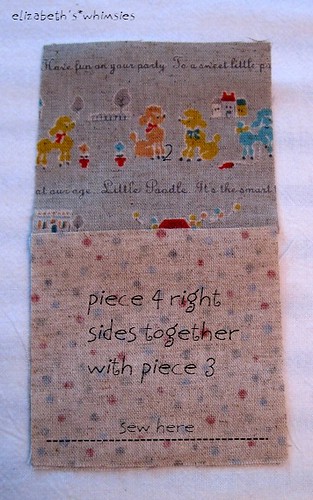
3. Right sides together, sew piece 2 to piece 3. Press the seam open.
4. Align piece 4 right sides together with the unit you just made (piece 2 and 3) and sew the seam as marked in the photo and press the seam open.
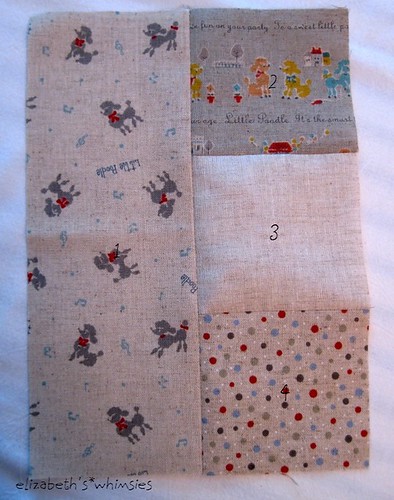
5. Align piece 1 right sides together with the patchwork strip you just created. Sew the long seam between the pieces and press the seam open. You have now completed the patchwork front.
6. Place the front piece right sides together with the back piece and sew the seam between the two to form a single unit as seen in the photo.
7. Place your sewn front and back on top of your piece of cotton batting, allowing the batting to stick out at least ½ inch all around.
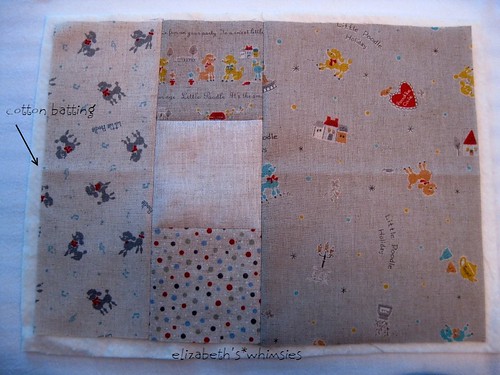
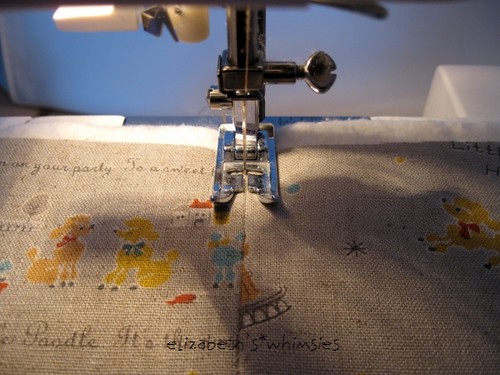
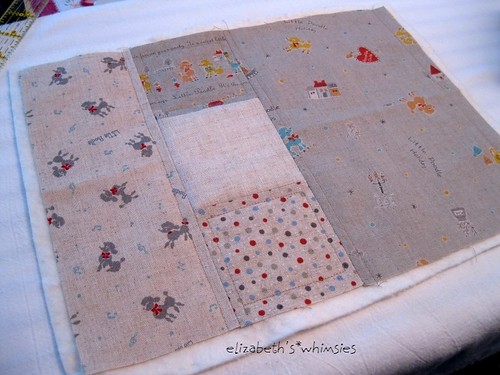
8. Quilt however you want. I quilted “in the ditch” on the seam between the front and back and then quilted ¼ inch inside the squares on the front. Once you are done quilting, trim the excess batting even with the quilted top.
9. Cut a 4” piece of cotton yarn or twine and fold it in half. Center it on the top of the back piece and pin it into place. This will be the loop for your button. Leave the twine sticking about 3/4 inch past the fabric, as shown below. You will trim the extra off later.

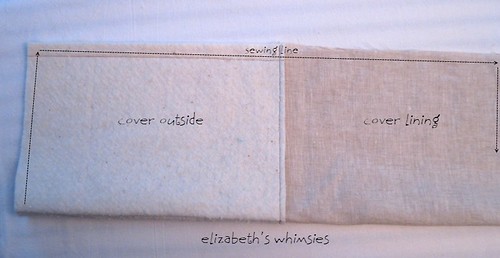
10. Place the lining piece (plain linen here) right sides together with the outside of the cover and sew the seam along the top of the bag, making sure to catch your pinned yarn/twine in the sandwich. Trim the seam about 1/8” from the stitch line to reduce bulk and iron open.
11. Place the sewn unit down on your work surface in the orientation above and fold it in half lengthwise to make a long tube as seen below.
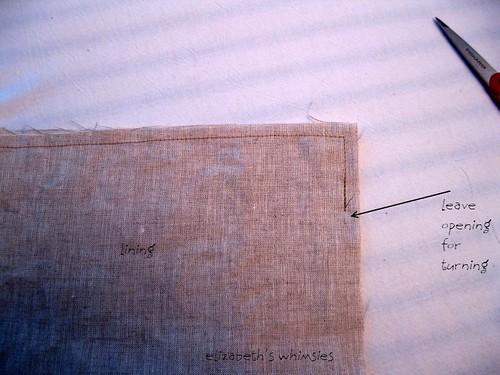
12. Sew around, starting with the outside of the cover and using a ¼ inch seam allowance. Continue sewing all around the outside to the lining but leave about 3 inches or so on the bottom of the lining to turn the cover as seen here.
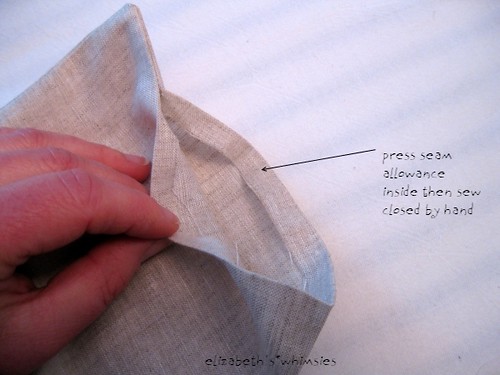
13. Turn. Press the seam allowance to the inside and sew the lining closed by hand using ladder stitch.
14. Tuck the lining inside the case and iron to neaten everything up.

15. Then, top stitch around the top of the case to hold everything securely together.
16. Sew your button on the front by hand. I used doubled thread that I waxed by running it through a hunk of beeswax. I find it is more durable that way.
Put your Kindle inside and close the top button!
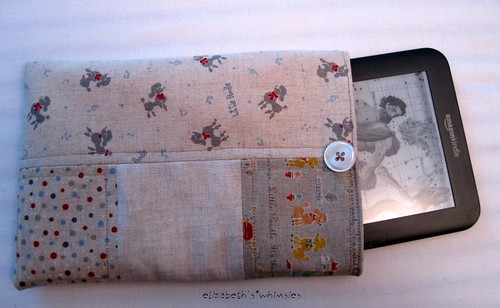
Your case is complete! Off you go, scratch free!
Edited to add (May 11, 2011): If you use this to pattern to sell Kindle covers on etsy or otherwise, a word of credit would be great. It has been brought to my attention that etsy is flooded with Kindle covers from my tutorial and I see none that have mentioned where the pattern was obtained. I don't mind, just please don't claim the credit for inventing the pattern yourself. Also, do not copy these directions, make them into a tutorial and sell the pattern on etsy. That's just lame, people.
Edited to add (May 11, 2011): If you use this to pattern to sell Kindle covers on etsy or otherwise, a word of credit would be great. It has been brought to my attention that etsy is flooded with Kindle covers from my tutorial and I see none that have mentioned where the pattern was obtained. I don't mind, just please don't claim the credit for inventing the pattern yourself. Also, do not copy these directions, make them into a tutorial and sell the pattern on etsy. That's just lame, people.
Awesome! Very clear!
ReplyDeleteYou should make lots more tutorials :)
Becky
Perfect timing, I've got some time off work this week and sewing covers for the three kindles in my family is top of the list! I wish I had done it sooner as I've already scratched mine but it's not too noticeable.
ReplyDeleteAdorable! such lovely thing:) Yana
ReplyDeleteSo glad I saw this on Maker Crafts. I got hubby a computer tablet and son got a e-reader for Xmas, both could use this. I trust fuse-able batting will work, just be a bit bulker. I'm in Pennsylvania and its still a bit icy to go out shopping.
ReplyDeletethank you! looks great.
ReplyDeleteI've SOO been waiting for just this very thing to cover my reader.Perfect tutorial,it's like being in a sewing class.
ReplyDeleteThanks a million, you clever girl!!
Warm Regards,
Susan Burns
Western Massachusetts
Hi,again. I just read your post from Jan 29 about the ducks and chickens.
ReplyDeleteI want to convert my med. size shed to a hen house, but wondered how the girls would fare in this sub-zero weather here in Western Mass. Do you have the coops heated? I want to start keeping hens and haven't had the courage because I just don't know where to start. Your weather is similar to ours, and your flock looks so happy and content! If you have any tips on where I can begin please email if you have the time, you are probably a very busy gal, so if you can't I understand.
Warmest Regards,
Susan Burns
Western Massachusetts
I love this idea! I have a new ipad and really want to make a case for it. I'm very new to sewing, and love your tutorial! I might try making this crocheting the pieces and patchwork them together, I'm still scared of my sewing machine! lol
ReplyDeleteReally terrific tut! Thank you.
ReplyDeleteI'm glad you're all enjoying the tutorial! I plan on making at least one more for my sister.
ReplyDeleteSusan, about ducks and chickens--here's a great blog for you and I believe she's in your neck of the woods: http://www.hencam.com/henblog/
I do put a small ceramic wall heater in my chicken coop that keeps it just above freezing on the very cold days, but it is most likely not necessary at all. The ducks have no heater and they are absolutely fine! Here's one more great place to look up any other questions you have: http://www.backyardchickens.com/forum/index.php
Elizabeth, thanks so much for taking the time to help me out with the
ReplyDeletechicks. Again, you did a fantastic job with the tutorial, just like being in a live class! Stay warm...
Warmest Regards,
Susan Burns Buried Under Snow In
Western Massachusetts
awesome!! I'm gonna have to make 'boy' sleeves for my two teens with Nooks. thanks for the help!!
ReplyDeleteevelyn over at wildhorseranchdesign.blogspot.com
Thank you for your clear instructions and inspiration. I modified the measurements and just completed one for my son's ipad. Not sure how to post a photo here, but it came out great!!
ReplyDeleteWow, love it!
ReplyDeleteThank you for sharing!
Awesome! Very inspiring.
ReplyDeleteFantastic. I bought my husband a kindle for his birthday today and last night decided it needed a cover. A quick google brought me to your tutorial and a short while later the new kindle had a perfect cover!!! Thank you for such a clear and informative tutorial.
ReplyDeleteps husband very pleased with present
That is SO cute! I love the patchwork design. It would be so much fun to look at my favorite fabrics each time I used my reader. I would love to link to this if you didn't mind.
ReplyDeleteRachel, you can certainly link to it if you'd like. I'm glad everyone's having a good time with the tutorial. :)
ReplyDeleteHello, I am Marianne from Holland. What is the size of the Kindle? I was about to make a cover for my husbands e-reader, bur he has a Sony. This one measures 12 by 17 cm and is about 1/2 cm thick. Can you answer me? m.elferink@live.nl
ReplyDeleteThis comment has been removed by the author.
ReplyDeleteThis comment has been removed by a blog administrator.
ReplyDeleteMarianne, I sent you an email, but the cover will fit the Sony E-reader.
ReplyDelete__________________________
To all: I appreciate your enthusiasm, but please do not use foul language in your comments or I'll delete them. My nieces read this blog and they should not see curse words.
Marianne,
ReplyDeleteyour precious post is a helpful hint. Great. Fantastic. Tks. ;-)
a practical and easy cover to make.thank u
ReplyDeleteThank you sew much for the tutorial. I am a novice sewer and I was able to make the cutest kindle cover thanks to you ;)
ReplyDeleteHey,
ReplyDeleteMade two for my step-daughter...one for the beach and one for home/work. Thank you! Very lovely, although you are a MUCH better seamstress than I.
Hi Elizabeth, thanks so much for posting this nifty tutorial. I adapted it for an iPad for a friend of mine, and it turned out great.
ReplyDeleteI linked to you in my two posts about it.
I really like this cover, thank you for sharing it with us.
ReplyDeleteI just became a follower of your blog:) and of course you are welcome to visit/follow mine.
Have a great day
Tora
hello, i randomly stopped by your blog. my colleague just asked me to make a kindle cover for her several days ago! Thanks for sharing this tutorial.
ReplyDeleteI just made one of these today and it turned out so awesome. Thanks for the great tutorial, it was easy to follow and with great results! :)
ReplyDeleteOh, you are so smart and talented! IT's a shame people will rip you off on your own design.
ReplyDeleteGreat pattern! My grandma just got a Kindle last week for her birthday so this will be the perfect Christmas gift! Thanks for sharing!
ReplyDeleteI just found this pattern today and came home and immediately tried it out for myself. it worked great! i had to adjust it some since i'm getting the new Kindle Touch, but other than the dimensions, all I did different was add some magnets to the top. i'll have to tweak the idea some for my next one, but I wanted to give credit where credit is due. Great pattern! Great idea! thanks for the easy instructions too!
ReplyDeleteGreat tutorial, easy to follow. Thanks for sharing!!
ReplyDeleteThis is exactly what I was searching for! My Mom has a kindle and she loves all things having to do with quilting, so this will be the perfect gift to make her for Christmas!
ReplyDeleteThanks!
xoxo
Great tutorial! I just got a kindle from my parents and have been looking at all the different cover tutorials to find the right one. I love your patchwork one! I wanted to use a few different fabrics, but not do one with a ton of tiny squares and this would be perfect. My kindle is 6.5 x 4.5 inches, should I adjust the cover to be smaller? I am still pretty new at sewing, so any advice would be helpful!
ReplyDeleteMarie, I would probably either just make the seam allowances a little bigger (3/8 instead of 1/4 inch) or take a little bit off each side. You could just make it full sized, though; it would be a little bit loose but not a lot. I made one in this size for my sister's Sony reader and it is a little big but not too bad.
ReplyDeleteThanks so much for the advice and the tutorial, I am excited to make this!
ReplyDeleteSorry for posting yet again on here, but I made the kindle cover and I love it! I posted pictures on my blog and linked to yours, hope you don't mind! Thanks so much!
ReplyDeleteMarie, thanks for sharing your work! :) Looks great!
ReplyDeleteThanks so much for this tutorial! I saw a kindle sleeve on Etsy that must have been made from your pattern and found your tutorial using a google search. It was exactly what I needed! I do better with visual tutorials rather than real patterns. Anyway, my sleeve turned out perfect and I love it! I just used one fabric, I didn't do the patchwork. But I think I will make another one doing the patchwork, I have a lot of little scraps I can use. Oh, I also used poly batting just because I had some and it was fine. Thanks again!
ReplyDeleteHi! I made this last night as my very first "proper" sewing project, as I got a sewing machine for Christmas :-) I used some thin fleece I "liberated" from a blanket instead of batting, as I don't have any of that. I have completed it as far as the last 2 steps i.e. to do the top stitch round the top, and to add the button. I get the feeling it would actually be a little too thick to do the top stitching on my machine... will it matter too much if I don't do it? Thanks for the tutorial!
ReplyDeleteHi Helen! It won't matter much at all if you leave the top-stitching off. :) Happy sewing to you with your new machine!
ReplyDeleteThanks for sharing your pattern and not charging. My daughter got a Kindle Fire for Christmas and wanted me to make her a cover. So I got on Etsy and just looked. I then created my own which is similar to yours. I did not make it patchwork. I simply quilted the outer covering and used interfacing on the inner lining. I then assembled it much as I do the tote bags I make. I made a closing from the outer fabric and then added a button to close it with. Eventually I might sell some on my Etsy shop but I honestly did not copy from you. Thanks so much for sharing!!!
ReplyDeleteTrish, I hope you share a photo of yours! :)
ReplyDeleteWill do when I get it back from her.
ReplyDeleteThis comment has been removed by the author.
ReplyDeleteI would post a picture but don't know how to do it on this sight.
ReplyDeletebrilliant tutorial, thanks so much, making one for my sister-inlaw as she's going on a trip and was fretting over her kindle hahaha. thanks again, and I hope people give you the credit you deserve if they use your pattern! I'll def link if I post on my blog!
ReplyDeleteok, I've just made it, and it took so little time considering I'd to make snacks for me two boys and have a cup of tea in between the time I started and finished! Its a fab tutorial, so easy to follow. I"m going to make one now for my mam, and I'll def credit you and link on my blog. Cheers, Paula
ReplyDeletewww.coffeeandhugs.blogspot.com
Thank you for all tutorial.
ReplyDeleteI can make it from your clear guide.
I gave a credit to your blog by post your link on my item page.
You can see my item which applied from your cover here
http://www.etsy.com/listing/95561012/kindle-sleeve-embroidery-cover-padded
Thank you again =)
I bought a few patterns for ereaders - and haven't liked how they have turned out. Your tutorial was VERY easy to follow and quick to make. I made 3 in an hour! I will definitely give you credit if I ever sell these!
ReplyDeleteNathalie
I used your excellent tutorial to make my first ever patchwork project. Many Thanks for the detailed instructions I'm really pleased with the finished article.
ReplyDeletePS I'm in the UK and think the idea of living by a beaver pond is enchanting!
My sister just made this for me for my Kindle and we both LOVE it ! Thanks so much for the tutorial. <3
ReplyDeleteThank you so much for this tutorial, I made one for my Nook that I received for Christmas. It turned out lovely. ;-)
ReplyDeleteThank you for this! I've now made two covers (http://nurkassa.wordpress.com/2013/02/04/no-inspiration/ and http://nurkassa.wordpress.com/2012/10/25/pussukka-kindlelle/) with the help of your tutorial, it's beautiful and very clear.
ReplyDeleteLeena
Thank you for this tutorial! It was very easy to follow for a newbie to sewing. I've put it on my page at https://www.facebook.com/EvieHandmadeJewellery.
ReplyDeleteNikki x